
How to Photograph Your Artwork: Tips for Better Photos, Online Sales, and Fine Art Printing
Share
You've spent hours creating a piece of artwork. You've chosen the colors, worked through the details, and put a little bit of yourself into it. Now it's time to share it with the world.
But before you upload it to your website, submit it to a gallery, or offer prints for sale, there's one important step: getting a good photograph of your artwork.
You don't necessarily need an expensive camera or professional photography equipment to get a usable image. With a little attention to lighting, setup, and your phone's camera settings, you can capture a photograph that represents your work much more accurately.
Whether you're photographing paintings, drawings, mixed media, or other flat artwork, here are some tips to help you get better results at home.
1. Start With Good Lighting
Lighting can make or break a photograph of your artwork. Too much light can wash out details, while too little can make your colors and textures difficult to see.
Here are a few things to keep in mind:
-
Take advantage of cloudy days. Overcast weather creates soft, even lighting that helps minimize harsh shadows and bright spots. It's often a great time to photograph artwork.
-
Avoid lighting that's too bright or too dark. You want to capture the details without losing information in the highlights or shadows.
-
Watch for shadows. Make sure your body, phone, or other objects aren't casting shadows across the artwork.
-
Be mindful of warm lighting. Yellow or warm-toned indoor lights can change how the colors in your artwork appear in a digital photograph. If you can't adjust the color of your image afterward, try to use neutral, natural lighting instead.
-
Balance your light sources. Watch for glare coming from nearby windows or overhead lights. Uneven lighting can create bright spots that make parts of your artwork difficult to see.
The goal is to create lighting that is as even and neutral as possible so the photograph represents your original artwork.
2. Set Up Your Artwork Properly
Once you've found a good lighting situation, it's time to set up your artwork.
You have a couple of options depending on the size and type of piece you're photographing.
Option 1: Lay it flat.
Place your artwork on a light-colored, solid background. Make sure the surface is clean and free of anything that could distract from the piece.
Option 2: Hang it on a wall.
Hanging your artwork can make it easier to photograph larger pieces. Choose a neutral wall and make sure the artwork is secure and positioned straight.
Whichever method you choose, keep these tips in mind:
-
Photograph the artwork as straight-on as possible. Avoid taking the picture from above, below, or at an angle. Angles can distort the proportions of your piece.
-
Get as close as possible while keeping the entire artwork in the frame. Avoid cropping off edges or important details.
-
Use a tripod or another stable surface to hold your phone in place instead of holding it in your hands. This helps prevent blurry images.
-
Check the edges of your photograph before taking the picture to make sure everything is aligned.
A simple DIY photography setup
If you plan to photograph artwork regularly, consider making a small photography setup using foam board.
You can create a simple box-like structure with white foam board to help reflect and balance light around your artwork. This can be especially useful when photographing smaller pieces.
If you have room to store it, tape the pieces together. If you'd rather have something you can take apart and store flat, use Velcro to make the setup collapsible.
It's an inexpensive way to create a more consistent photography environment.
3. Avoid Glare on Your Artwork
Glare is one of the biggest challenges when photographing artwork, especially pieces behind glass or artwork that has been varnished.
A beautiful painting can suddenly look washed out because of a reflection from a window, ceiling light, or even your phone.
Here are two ways to help prevent that:
Remove artwork from behind glass.
If possible, take the artwork out of its frame before photographing it. Glass creates reflections that can be difficult to eliminate.
If removing the artwork means the paper needs to be reattached to the backing, a local frame shop can help you get it secured again.
Photograph before applying varnish.
If you're working with paintings that require varnish, consider photographing the artwork before applying it. Depending on the finish, varnish can create reflective areas that make photography more difficult.
Taking care of glare at the beginning will save you time trying to fix it digitally later.
4. Get the Most Out of Your Phone's Camera
You probably already have a camera that can get the job done sitting in your pocket.
Modern smartphones can take surprisingly good photographs, but a few simple habits can make a noticeable difference.
-
Clean your camera lens. This sounds obvious, but fingerprints and dust can make your photographs look hazy.
-
Don't use zoom. Instead of zooming in, physically move closer to the artwork. Digital zoom can reduce image quality and detail.
-
Use your back camera. The rear-facing camera generally offers better image quality than the front-facing selfie camera.
-
Keep your phone steady. Use a tripod or prop your phone against something stable.
Different phones can also produce different results. I've seen some Android phones, including the Samsung S22, capture surprisingly detailed images compared to older iPhone models like the iPhone 12.
Don't assume you need to upgrade your phone before experimenting with what you already have.
5. Photograph Your Artwork for Online Promotion and Gallery Submissions
Taking a photograph that accurately represents your artwork is important, but if you're selling your work online, you also want people to imagine owning it.
Think about what would make someone want to buy your artwork. Your photography is part of your marketing, and the way you present a piece can help someone connect with it.
Show your artwork in a setting.
Sometimes people need a little help visualizing how a piece will look in their own home.
Try photographing your artwork:
-
In a frame displayed alongside home decor.
-
On a wall with furniture and other complementary pieces.
-
With themed objects that help establish a mood or tell a story.
-
In an overhead flat-lay arrangement with carefully selected items.
These types of photographs help bridge the gap between seeing a piece of artwork online and imagining it in someone's home.
Capture close-up details.
Don't forget to take close-up photographs! If your artwork has interesting textures, brush strokes, intricate details, or layers, show them off.
People want to see the details that make your work unique. A close-up photograph can communicate things that a full image sometimes cannot.
Use both styled and straightforward photographs.
I recommend having a combination of images for each piece:
-
A straight-on photograph of the entire artwork.
-
Close-up photographs showing important details.
-
A styled photograph showing the artwork in a setting.
-
An image showing the artwork framed or displayed, when possible.
The straightforward photograph shows the actual piece, while the styled photographs help potential buyers picture it in their lives.
Just remember that when submitting work to a gallery or other organization, always follow its specific photography requirements. Styled images are great for marketing, but they may not be appropriate for formal submissions.
6. Uploading Your Artwork to Prints & Repeat
You've taken your photograph, you're happy with how it looks, and now you're ready to turn your artwork into prints!
You don't need to email files back and forth or figure out complicated printing requirements. You can upload your artwork directly through the Prints & Repeat website when placing your order.
Here's how to get started:
Step 1: Visit the Prints & Repeat website.
Head over to printsampersandrepeat.com and find the fine art printing options.
Step 2: Choose your print options.
Select the print size and paper options that work best for your artwork. If you're not sure which paper to choose, don't worry. I'm happy to help you decide.
Step 3: Upload your artwork.
When placing your order, you'll have the opportunity to upload your digital image. Select the photograph of your artwork that you'd like printed.
For the best results, upload the original photograph directly from your phone or computer. Avoid screenshots, social media downloads, or images that have been resized or compressed.
Step 4: Complete your order.
Follow the checkout instructions to submit your order. Once I receive your file, I'll review it to make sure it looks suitable for printing.
If I notice anything that could affect the finished print, I'll let you know before moving forward. I want you to feel confident about what you're ordering and what you'll receive.
A little unsure about your image?
That's perfectly fine! You don't have to know the technical side of printing. I'll check your file, look at the available detail, and help you understand what size and print options will work.
My goal is to make getting your artwork printed as easy as possible, so you can spend less time worrying about the technical details and more time creating.
When sending artwork for printing, original image files are always preferable. Avoid taking a screenshot of your photograph or sending an image that has already been resized or compressed.
What file format should you send?
For most smartphone photographs, the original JPG or HEIC file is a good starting point. If you have the option to export a full-resolution TIFF, that can also be useful.
You don't need to worry about converting everything yourself. Send the original file, and I can help determine what works best for your project.
7. Start Photographing Every Piece You Create
Make photographing your artwork part of your creative process.
Even if you aren't planning to sell prints right away, take a high-quality photograph of every finished piece. You never know when you might want to offer prints, submit work to a gallery, update your website, or share something from your portfolio.
Having those files ready makes it much easier to start selling without having to go back and photograph everything later.
You can even use those photographs to test interest in a piece and collect pre-orders before investing in printing inventory. That means you can start generating sales without paying for a large print run upfront.
And when you're ready to turn those digital images into physical products, you don't have to know anything about printing. That's where I come in.
8. When to Choose Professional Artwork Digitizing
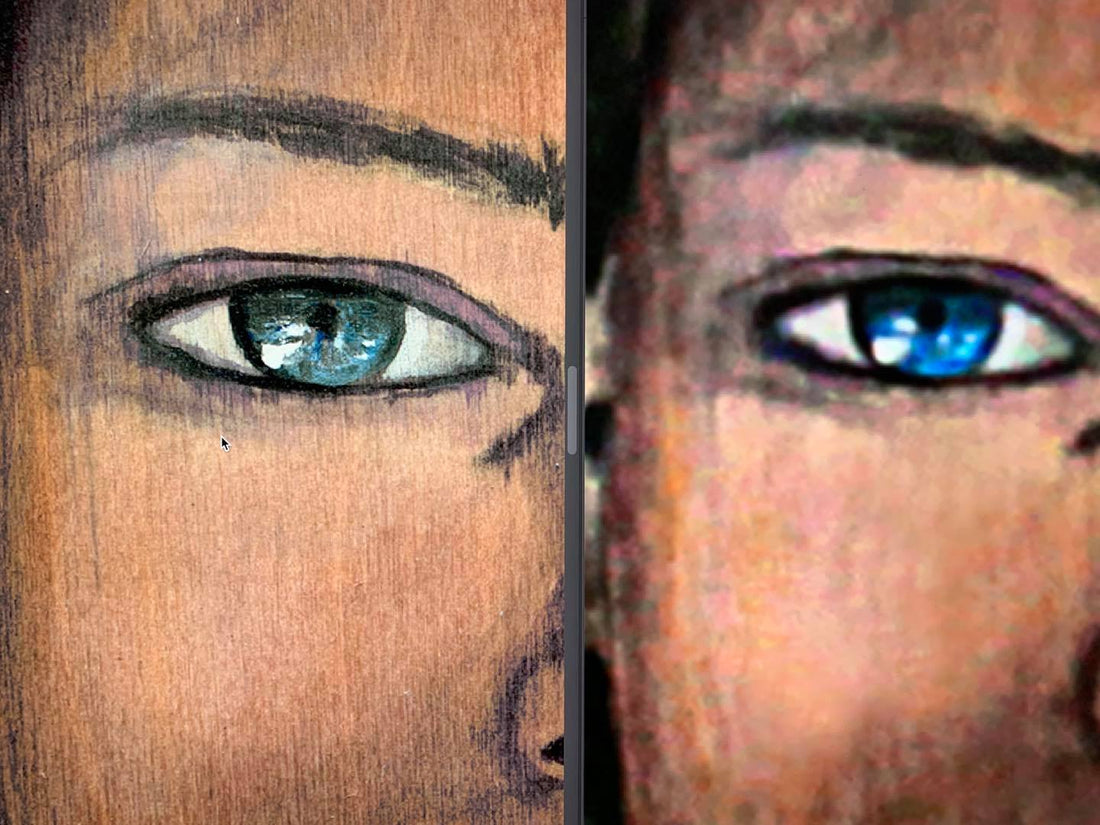
Photographing your artwork with your phone is a great way to get started. It's quick, inexpensive, and can work well for sharing your work online, submitting images for consideration, or testing interest in offering prints. The example photo shows the difference.
However, if you're planning to sell fine art reproductions, you'll eventually want to consider professional artwork digitizing.
There is a difference between taking a photograph of your artwork and professionally capturing it for reproduction. A phone photograph may not capture all the fine details, textures, subtle color variations, and brushwork that make your original piece unique.
At Prints & Repeat, I offer professional artwork digitizing through high-resolution scanning and art reproduction photography. These processes are designed to capture much more detail and provide a more accurate digital representation of your original artwork.
When should you consider professional digitizing?
-
You're planning to sell fine art prints of your original work.
-
Your artwork has intricate details, textures, or subtle color variations.
-
You want to create prints in larger sizes.
-
Color accuracy is especially important.
-
You plan to reproduce your artwork multiple times and want a reliable digital master file.
-
You're building an online shop or print collection and want consistent results.
Think of professional digitizing as an investment in your artwork's future. Having a quality digital file means you can return to it whenever you're ready to create more prints, without having to photograph the original again.
Not sure what you need?
You don't have to figure that out on your own. I can help determine whether your existing photograph will work or whether professional scanning or art reproduction photography would be a better option.
Sometimes a phone photograph is all you need. Other times, investing in a professional digital capture can make a significant difference in the finished print.
The goal is to get the best possible reproduction of the artwork you've worked so hard to create.
Ready to Turn Your Artwork Into Prints?
At Prints & Repeat, I work with artists to make fine art printing approachable, from choosing the right paper to getting your digital files ready for production.
If you're unsure whether your photograph is good enough to print, send it my way. I'll review the file, check the available detail, and help you understand what the finished print will look like before moving forward.
Whether you're starting with one piece or building an entire collection of prints, you can focus on creating while I take care of the printing details.
Your artwork deserves to be seen, shared, and enjoyed beyond the original piece. Let's make that happen.
Visit Prints & Repeat to learn more about fine art printing and artwork digitizing.